
STORY BY LIZ HINLEY
PHOTOS BY LIZ HINLEY AND PETER SPURRIER
To continue reading…
This article is exclusively for Rowing News subscribers. For as little as $5 a month, you can get access to the best quality, independent reporting on all the issues that matter to the North American rowing community.
Already a subscriber? Login
The phrase “breaking my back” has a double meaning for rowers as they always work hard to move the boat but it can also literally mean breaking one’s back when it comes to spinal posture on the erg and in the boat. Potential injuries that can result from having poor posture.
Proper posture is crucial for spinal health as well as setting up a great catch position for a strong drive phase.
Here’s spinal alignment broken down and how to use it to find proper alignment, apply it to rowing, as well as ways to support the position with core exercises.
By separating the spine into four sections, we can focus on each to elongate the spine by using the surrounding core muscles. The sections are pelvic (sacral), lumbar, thoracic, and head (cervical).


- To start, rotate the pelvis so that the tailbone draws down towards the ground. Do so by lifting up the lower abdominal muscles.

- Once the pelvis is locked in, squeeze the mid abdominal muscles (the gut) in and up towards the spine.

- With the pelvic and lumbar locked in place, draw the shoulders down and back. Allow the chest to open wide with a lifting sensation versus a pinching back movement. This will elongate the thoracic area.


- Lastly, with the three previous areas aligned, we stretch the cervical spine by extending up through the crown of the head towards the ceiling and the chin tucking slightly down.


Just as we built from the bottom up, proper position in the boat and on the erg starts with good pelvic placement.
For example, at the catch, look to fully rotate over by pivoting at the hips instead of the back. This allows us to squeeze the belly towards the legs with the lumbar straight and protected by the surrounding core muscles.
With the shoulders down and back, we are locked in and ready for the oars to connect with the water as well as having a wide chest to minimize lung compression.
Lastly, the headrests in alignment with a steady, forward gaze preventing extraneous movement.
Below are some exercises we can do to strengthen and support this spinal position.
- Posterior Pelvic Tilts

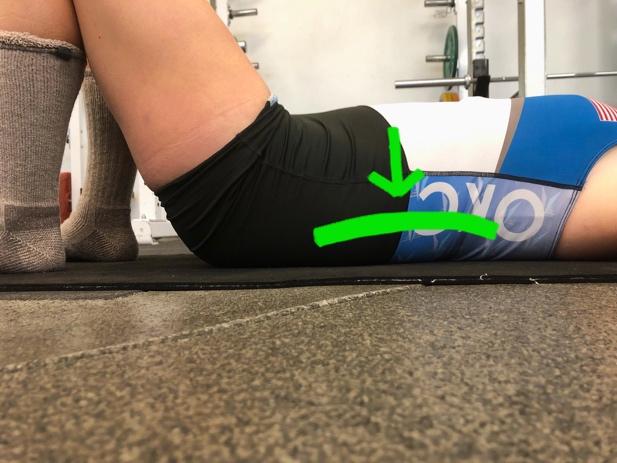
Lay on your back with feet hip-width apart, knees hip-width apart, and arms resting by your sides or with your hands on your hips (not depicted here). The low back will want to lift away from the floor. Using our low abdominal muscles, press the low back into the floor with a slight rotation of the pelvis, hold that position for about 3 seconds, then release.
- Dead Bug


Lay on your back with knees up to a 90-degree angle, feet in the air, and arms extended either straight above to the ceiling or above the head if you choose to hold a weight or dumbbell. Like pelvic tilts, squeeze the lower abdominals muscles so that the low back presses into the floor. Tighten the core around the midbody and open the chest with the shoulders down and back flat against the floor. Hold this position as you lower one leg at a time to just above the ground. With the modification of the arms without the weight, lower the opposite arm from the leg that is lowering (i.e. right arm, left leg). The goal is to keep the core tight as the limbs move.
- Plank

Apply the four sections we worked on in a standing position into planks. Imagine a straight line from head to heal when in the position. To add an extra challenge, try moving around the limbs without moving the torso or add some weight resting the back.
